What is Kafka Connect?
Kafka Connect is a tool designed for scalable and reliable streaming data transfer between Apache Kafka® and various other data systems. It standardizes the process of moving data in and out of Kafka, making it simple to define connectors for efficiently transporting large datasets within Kafka. This facilitates the easier construction of large-scale real-time data pipelines.
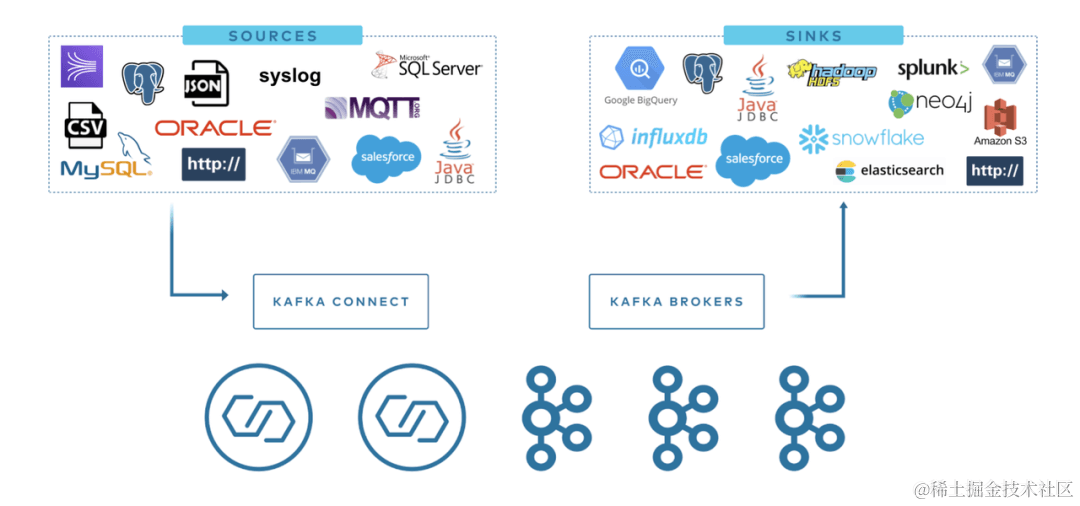
We use Kafka Connect to read from or write to external systems, manage data flows, and extend systems, all without the need to develop new code. Kafka Connect handles all common issues that arise when connecting to other systems, such as schema management, fault tolerance, parallelism, latency, delivery semantics, and more. Each connector focuses solely on replicating data between the target system and Kafka.
Kafka connectors are typically used to build data pipelines and serve two main use cases:
-
Start and End Points: For example, exporting data from Kafka to a Databend database or importing data from a MySQL database into Kafka.
-
Intermediate Data Transport: For instance, to store massive log data in Elasticsearch, you can first transfer this log data to Kafka and then import it from Kafka into Elasticsearch for storage. Kafka connectors can serve as buffers between different stages of the data pipeline, effectively decoupling consumer and producer applications.
Kafka Connect is divided into two main types:
- Source Connect: Imports data into Kafka.
- Sink Connect: Exports data from Kafka to target.
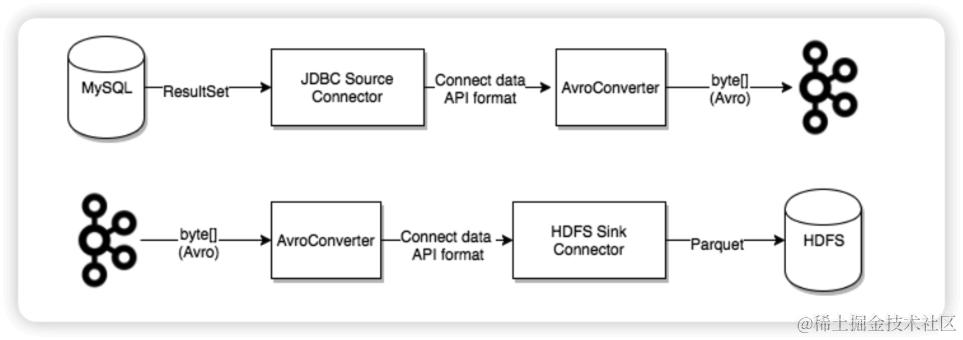
Databend Kafka Connect
Kafka currently offers over a hundred connectors on Confluent Hub, such as the Elasticsearch Service Sink Connector, Amazon Sink Connector, HDFS Sink, and more. Users can utilize these connectors to build data pipelines between various systems with Kafka at the center. Additionally, we now provide a Kafka Connect Sink Plugin for Databend. In this article, we will explain how to use the MySQL JDBC Source Connector and the Databend Sink Connector to construct a real-time data synchronization pipeline.
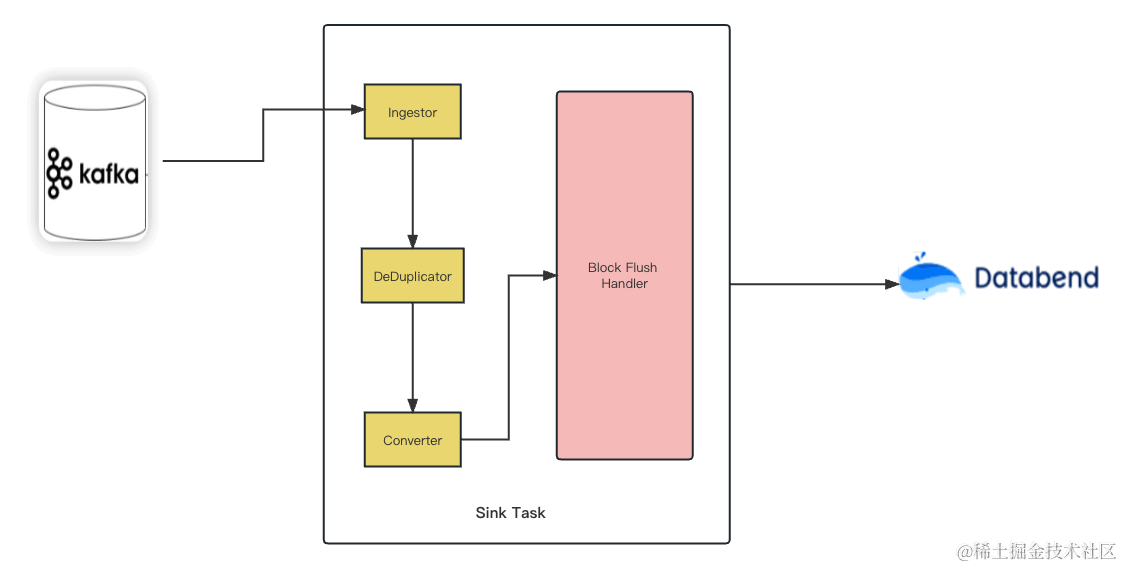
Starting Kafka Connect
This article assumes that the machine you are working on already has Apache Kafka installed. If you haven't installed it yet, you can refer to the Kafka quickstart for installation instructions. Kafka Connect currently supports two execution modes: Standalone mode and Distributed mode.
Standalone Mode
In Standalone mode, all the work is performed in a single process. This mode is easier to configure and get started with but doesn't fully leverage certain important features of Kafka Connect, such as fault tolerance. You can start the Standalone process using the following command:
bin/connect-standalone.sh config/connect-standalone.properties connector1.properties [connector2.properties ...]
The first parameter, config/connect-standalone.properties, is the worker configuration. It includes configuration for Kafka connection parameters, serialization formats, and offset commit frequency, among others. For example:
bootstrap.servers=localhost:9092
key.converter.schemas.enable=true
value.converter.schemas.enable=true
offset.storage.file.filename=/tmp/connect.offsets
offset.flush.interval.ms=10000
The subsequent configurations specify the parameters for the Connectors you want to start. The default configurations provided above are suitable for running in a local cluster using the default configurations from config/server.properties. If you use a different configuration or deploy in a production environment, you may need to adjust the default configurations. In any case, all Workers, whether standalone or distributed, require certain configurations:
-
bootstrap.servers: This parameter lists the broker servers that Connect will collaborate with. Connectors will write data to or read data from these brokers. You don't need to specify all brokers in the cluster, but it's recommended to specify at least three.
-
key.converter & value.converter: These parameters specify the converters used for the message key and message value. They are used to transform data between the Kafka Connect format and the serialization format when writing to or reading from Kafka. This controls the format of keys and values in messages written to Kafka or read from Kafka. Since this is unrelated to the Connector, any Connector can be used with any serialization format. The default is to use the JSONConverter provided by Kafka. Some converters may also include specific configuration parameters. For instance, you can specify whether JSON messages contain schemas by setting key.converter.schemas.enable to true or false.
-
offset.storage.file.filename: This is used to store the offset data in a file.
These configuration parameters allow Kafka Connect's producers and consumers to access the configuration, Offset, and state topics. The configurations for the producers used by Kafka Source tasks and the consumers used by Kafka Sink tasks can be specified with the same parameters, but you need to add 'producer.' and 'consumer.' prefixes separately. bootstrap.servers is the only Kafka client parameter that doesn't require a prefix.
Distributed Mode
In Distributed mode, Kafka Connect can automatically balance the workload, dynamically scale (up or down), and provide fault tolerance. The execution in Distributed mode is very similar to Standalone mode:
bin/connect-distributed.sh config/connect-distributed.properties
The main difference lies in the startup script and configuration parameters. In Distributed mode, you use connect-distributed.sh instead of connect-standalone.sh. The first worker configuration parameter uses the config/connect-distributed.properties configuration file:
bootstrap.servers=localhost:9092
group.id=connect-cluster
key.converter.schemas.enable=true
value.converter.schemas.enable=true
offset.storage.topic=connect-offsets
offset.storage.replication.factor=1
#offset.storage.partitions=25
config.storage.topic=connect-configs
config.storage.replication.factor=1
status.storage.topic=connect-status
status.storage.replication.factor=1
#status.storage.partitions=5
offset.flush.interval.ms=10000
Kafka Connect stores Offset, configuration, and task status in Kafka Topics. It is recommended to manually create the Offset, configuration, and status Topics with the desired number of partitions and replication factor. If you don't create the Topics before starting Kafka Connect, they will be automatically created with default partition counts and replication factors, which may not be suitable for your application. It's crucial to configure the following parameters before starting the cluster:
-
group.id: This is the unique name for the Connect cluster and defaults to connect-cluster. Workers with the same group id belong to the same Connect cluster. Note that this should not conflict with a consumer group id.
-
config.storage.topic: This is the Topic used to store Connector and task configurations, defaulting to connect-configs. It's important to note that this is a single-partition, highly replicated, and compressed Topic. You may need to manually create the Topic to ensure the correct configuration, as automatically created Topics may have multiple partitions or be set to delete rather than compression.
-
offset.storage.topic: This Topic is used to store Offsets and defaults to connect-offsets. This Topic can have multiple partitions.
-
status.storage.topic: This Topic is used to store status information and defaults to connect-status. This Topic can have multiple partitions.
In Distributed mode, it's important to manage Connectors via the REST API. For example:
GET /connectors – Returns all running connector names.
POST /connectors – Creates a new connector. The request body must be in JSON format and should include the `name` field and `config` field. `name` is the name of the connector, and `config` is in JSON format, containing your connector's configuration information.
GET /connectors/{name} – Retrieves information about a specific connector.
GET /connectors/{name}/config – Retrieves the configuration information for a specific connector.
PUT /connectors/{name}/config – Updates the configuration information for a specific connector.
Configuring Connector
MySQL Source Connector
- Installing MySQL Source Connector Plugin
In this step, we will use the JDBC Source Connector provided by Confluent.
Download the Kafka Connect JDBC plugin from Confluent Hub and unzip the zip file to the
/path/kafka/libs
- Installing MySQL JDBC Driver
Because the Connector needs to communicate with the database, a JDBC driver is also required. The JDBC Connector plugin doesn't come with a built-in MySQL driver, so we need to download the driver separately. MySQL provides JDBC drivers for various platforms. Select the "Platform Independent" option and download the compressed TAR file. This file contains JAR files and source code. Extract the contents of this tar.gz file to a temporary directory. Take the JAR file (e.g., mysql-connector-java-8.0.17.jar) and only copy this JAR file to the
libs
cp mysql-connector-j-8.0.32.jar /opt/homebrew/Cellar/kafka/3.4.0/libexec/libs/
- Configuring MySQL Connector
Create a mysql.properties configuration file under /path/kafka/config and use the following configuration:
name=test-source-mysql-autoincrement
connector.class=io.confluent.connect.jdbc.JdbcSourceConnector
tasks.max=1
connection.url=jdbc:mysql://localhost:3306/mydb?useSSL=false
connection.user=root
connection.password=123456
#mode=timestamp+incrementing
mode=incrementing
table.whitelist=mydb.test_kafka
poll.interval.ms=1000
table.poll.interval.ms=3000
incrementing.column.name=id
#timestamp.column.name=tms
topics=test_kafka
Regarding the configuration, here we will focus on the fields mode, incrementing.column.name, and timestamp.column.name. Kafka Connect MySQL JDBC Source offers three incremental synchronization modes:
- incrementing
- timestamp
- timestamp+incrementing
- In the "incrementing" mode, each time, it queries for records with values in the column specified by the incrementing.column.name parameter that are greater than the maximum ID fetched since the last pull:
SELECT * FROM mydb.test_kafka
WHERE id > ?
ORDER BY id ASC
The drawback of this mode is that it cannot capture changes made to rows (e.g., UPDATE, DELETE operations) because it cannot increment the ID of those rows.
- The "timestamp" mode is based on a timestamp column in the table to detect whether a row is new or has been modified. This column is best if it gets updated with each write operation and has monotonically increasing values. You need to specify the timestamp column using the timestamp.column.name parameter.
It's important to note that the timestamp column in the data table should not be set as Nullable.
In the "timestamp" mode, each time it queries for records with values in the column specified by the timestamp.column.name parameter that are greater than the gmt_modified timestamp of the last successful pull:
SELECT * FROM mydb.test_kafka
WHERE tms > ? AND tms < ?
ORDER BY tms ASC
This mode can capture UPDATE changes on rows, but it has a drawback that may lead to data loss. Since the timestamp column is not a unique column, there might be multiple rows with the same timestamp. If a crash occurs during the import of the second row, for instance, and you need to recover and re-import, the second row and subsequent rows with the same timestamp will be lost. This happens because after the successful import of the first row, the corresponding timestamp is marked as successfully consumed, and during recovery, synchronization starts from records with timestamps greater than that. Additionally, it's crucial to ensure that the timestamp column consistently increases over time. If someone manually modifies the timestamp to a value lower than the highest timestamp successfully synchronized, that change will also not be synchronized.
- Using only the incrementing or timestamp mode has its limitations. Combining timestamp and incrementing can help leverage the advantages of the incrementing mode for data integrity and the timestamp mode for capturing update operations. You should use the incrementing.column.name parameter to specify a strictly increasing column and the timestamp.column.name parameter to specify the timestamp column.
SELECT * FROM mydb.test_kafka
WHERE tms < ?
  AND ((tms = ? AND id > ?) OR tms > ?)
ORDER BY tms, id ASC
Since the MySQL JDBC Source Connector is based on a query-based data retrieval method using SELECT queries and doesn't have a complex mechanism to detect deleted rows, it doesn't support DELETE operations. For handling DELETE operations, you can explore using a log-based approach like [Kafka Connect Debezium]。
In the following demonstrations, the effects of the mentioned modes will be shown separately. For more configuration parameters, you can refer to MySQL Source Configs.
Databend Kafka Connector
- Installing or building Databend Kafka Connector
You can either build the JAR file from the source code or download it directly from the release page.
git clone https://github.com/databendcloud/databend-kafka-connect.git & cd databend-kafka-connect
mvn -Passembly -Dmaven.test.skip package
Copy the
databend-kafka-connect.jar
/path/kafka/libs
- Installing Databend JDBC Driver
Download the latest Databend JDBC from Maven Central and copy it to the
/path/kafka/libs
- Configuring Databend Kafka Connector
Create a file named
mysql.properties
/path/kafka/config
name=databend
connector.class=com.databend.kafka.connect.DatabendSinkConnector

connection.url=jdbc:databend://localhost:8000
connection.user=databend
connection.password=databend
connection.attempts=5
connection.backoff.ms=10000
connection.database=default

table.name.format=default.${topic}
max.retries=10
batch.size=1
auto.create=true
auto.evolve=true
insert.mode=upsert
pk.mode=record_value
pk.fields=id
topics=test_kafka
errors.tolerance=all
Setting
auto.create
auto.evolve
Testing Databend Kafka Connect
Prepare components
- Start MySQL.
version: '2.1'
services:
  postgres:
    image: debezium/example-postgres:1.1
    ports:
      - "5432:5432"
    environment:
      - POSTGRES_DB=postgres
      - POSTGRES_USER=postgres
      - POSTGRES_PASSWORD=postgres
  mysql:
    image: debezium/example-mysql:1.1
    ports:
      - "3306:3306"
    environment:
      - MYSQL_ROOT_PASSWORD=123456
      - MYSQL_USER=mysqluser
      - MYSQL_PASSWORD=mysqlpw
- Start Databend
version: '3'
services:
  databend:
    image: databendlabs/databend
    volumes:
      - /Users/hanshanjie/databend/local-test/databend/databend-query.toml:/etc/databend/query.toml
    environment:
      QUERY_DEFAULT_USER: databend
      QUERY_DEFAULT_PASSWORD: databend
      MINIO_ENABLED: 'true'
    ports:
      - '8000:8000'
      - '9000:9000'
      - '3307:3307'
      - '8124:8124'
- Start Kafka Connect in standalone mode and load the MySQL Source Connector and Databend Sink Connector:
./bin/connect-standalone.sh config/connect-standalone.properties config/databend.properties config/mysql.properties
[2023-09-06 17:39:23,128] WARN [databend|task-0] These configurations '[metrics.context.connect.kafka.cluster.id]' were supplied but are not used yet. (org.apache.kafka.clients.consumer.ConsumerConfig:385)
[2023-09-06 17:39:23,128] INFO [databend|task-0] Kafka version: 3.4.0 (org.apache.kafka.common.utils.AppInfoParser:119)
[2023-09-06 17:39:23,128] INFO [databend|task-0] Kafka commitId: 2e1947d240607d53 (org.apache.kafka.common.utils.AppInfoParser:120)
[2023-09-06 17:39:23,128] INFO [databend|task-0] Kafka startTimeMs: 1693993163128 (org.apache.kafka.common.utils.AppInfoParser:121)
[2023-09-06 17:39:23,148] INFO Created connector databend (org.apache.kafka.connect.cli.ConnectStandalone:113)
[2023-09-06 17:39:23,148] INFO [databend|task-0] [Consumer clientId=connector-consumer-databend-0, groupId=connect-databend] Subscribed to topic(s): test_kafka (org.apache.kafka.clients.consumer.KafkaConsumer:969)
[2023-09-06 17:39:23,150] INFO [databend|task-0] Starting Databend Sink task (com.databend.kafka.connect.sink.DatabendSinkConfig:33)
[2023-09-06 17:39:23,150] INFO [databend|task-0] DatabendSinkConfig values:...
Insert
In the Insert mode, we need to use the following MySQL Connector configuration:
name=test-source-mysql-jdbc-autoincrement
connector.class=io.confluent.connect.jdbc.JdbcSourceConnector
tasks.max=1
connection.url=jdbc:mysql://localhost:3306/mydb?useSSL=false
connection.user=root
connection.password=123456
#mode=timestamp+incrementing
mode=incrementing
table.whitelist=mydb.test_kafka
poll.interval.ms=1000
table.poll.interval.ms=3000
incrementing.column.name=id
#timestamp.column.name=tms
topics=test_kafka
Create a database mydb and a table test_kafka in MySQL:
CREATE DATABASE mydb;
USE mydb;

CREATE TABLE test_kafka (id INTEGER NOT NULL AUTO_INCREMENT PRIMARY KEY,name VARCHAR(255) NOT NULL,description VARCHAR(512));
ALTER TABLE test_kafka AUTO_INCREMENT = 10;
Before inserting data, databend-kafka-connect won't receive any events for table creation and data writing.
INSERT INTO test_kafka VALUES (default,"scooter","Small 2-wheel scooter"),
(default,"car battery","12V car battery"),
(default,"12-pack drill bits","12-pack of drill bits with sizes ranging from #40 to #3"),
(default,"hammer","12oz carpenter's hammer"),
(default,"hammer","14oz carpenter's hammer"),
(default,"hammer","16oz carpenter's hammer"),
(default,"rocks","box of assorted rocks"),
(default,"jacket","water resistent black wind breaker"),
(default,"cloud","test for databend"),
(default,"spare tire","24 inch spare tire");
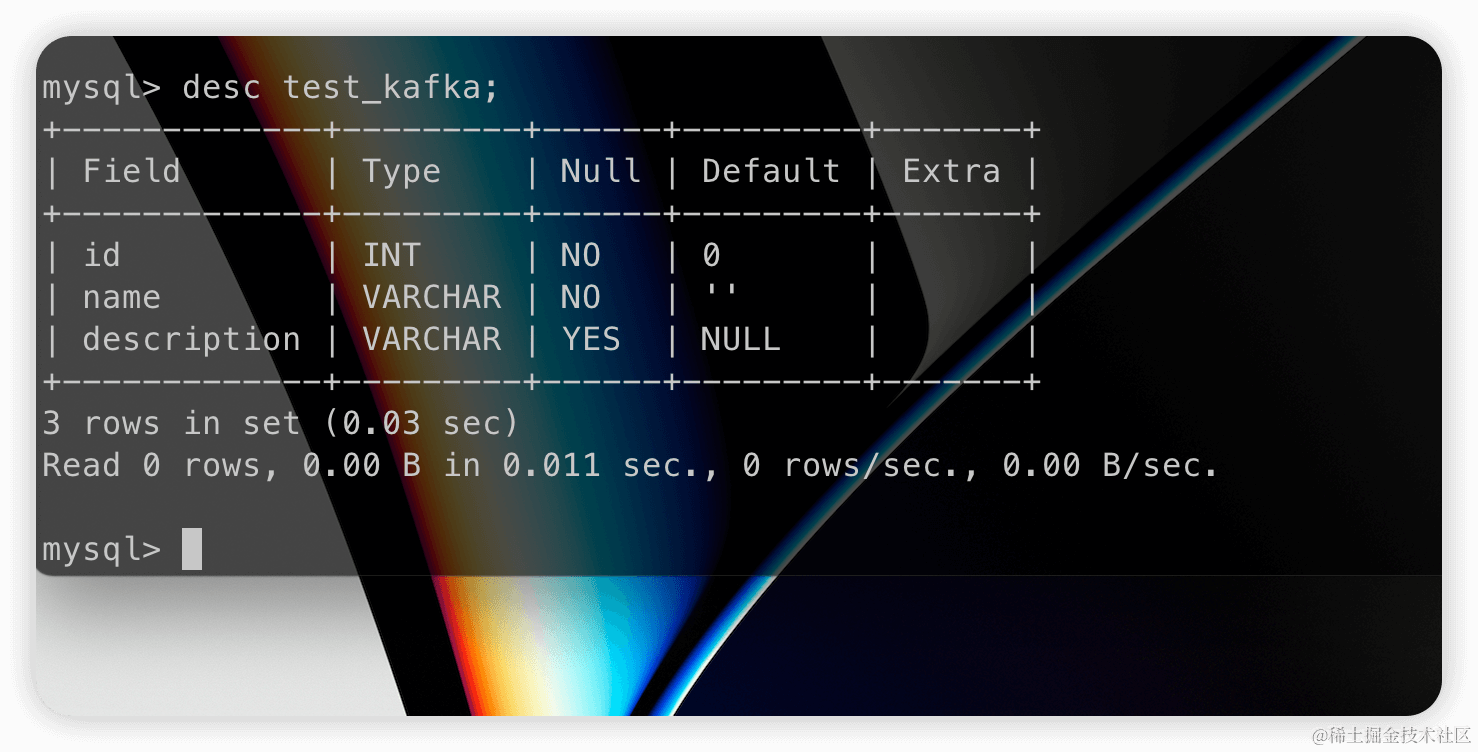
After inserting data into the source table, the table on the Databend target side is created:
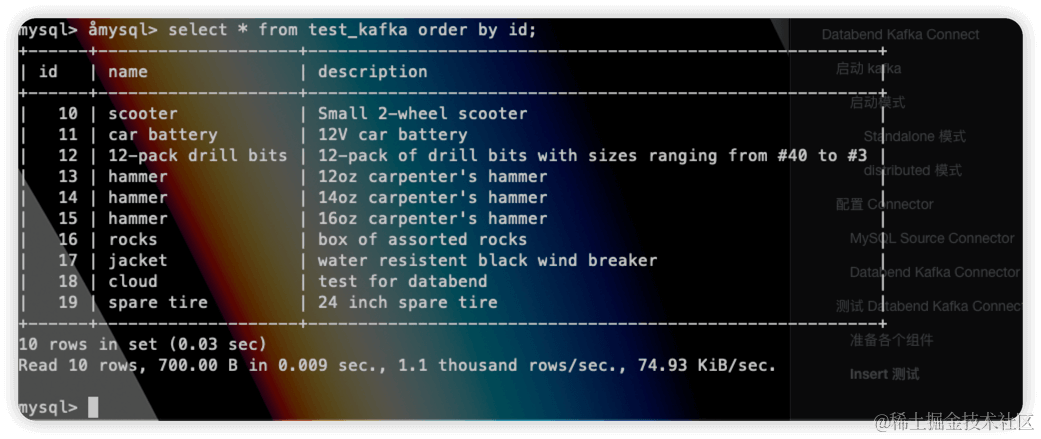
At the same time, data will also be successfully inserted:
Support DDL
We have set auto.evolve=true in the configuration file, so when the source table structure changes, the DDL will be synchronized to the target table. Here, we need to change the mode of the MySQL Source Connector from incrementing to timestamp+incrementing by adding a new timestamp field and enabling the timestamp.column.name=tms configuration. We execute the following on the original table:
alter table test_kafka add column tms timestamp;
And insert a row:
insert into test_kafka values(20,"new data","from kafka",now());
Check the target table:
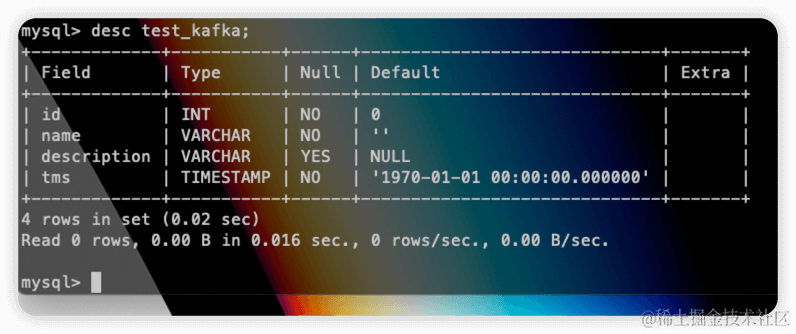
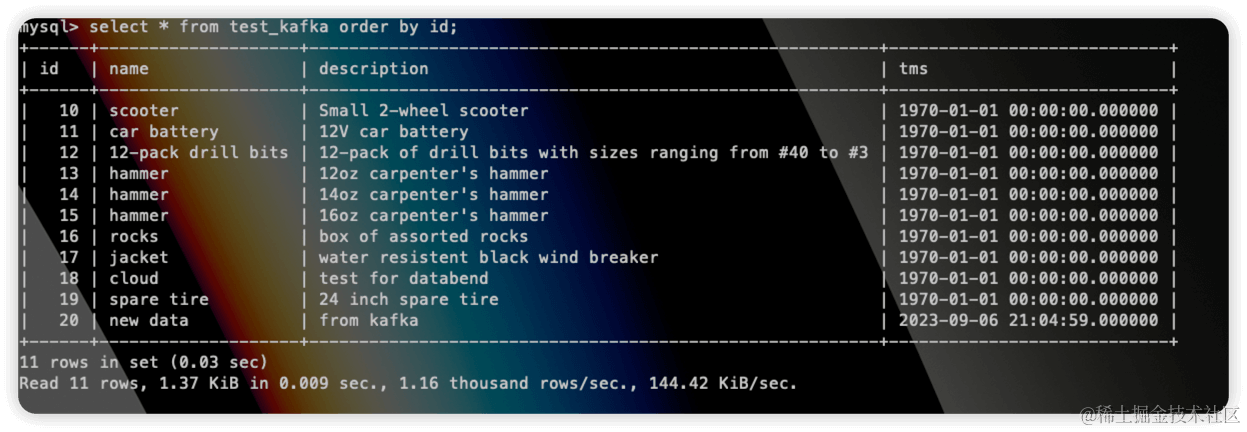
We can see that the tms field has been synchronized to the Databend table, and the data has also been successfully inserted:
Upsert
Modify the configuration of the MySQL Connector as follows:
name=test-source-mysql-jdbc-autoincrement
connector.class=io.confluent.connect.jdbc.JdbcSourceConnector
tasks.max=1
connection.url=jdbc:mysql://localhost:3306/mydb?useSSL=false
connection.user=root
connection.password=123456
mode=timestamp+incrementing
#mode=incrementing
table.whitelist=mydb.test_kafka
poll.interval.ms=1000
table.poll.interval.ms=3000
incrementing.column.name=id
timestamp.column.name=tms
topics=test_kafka
This changes the mode to
timestamp+incrementing
timestamp.column.name
Restart Kafka Connect.
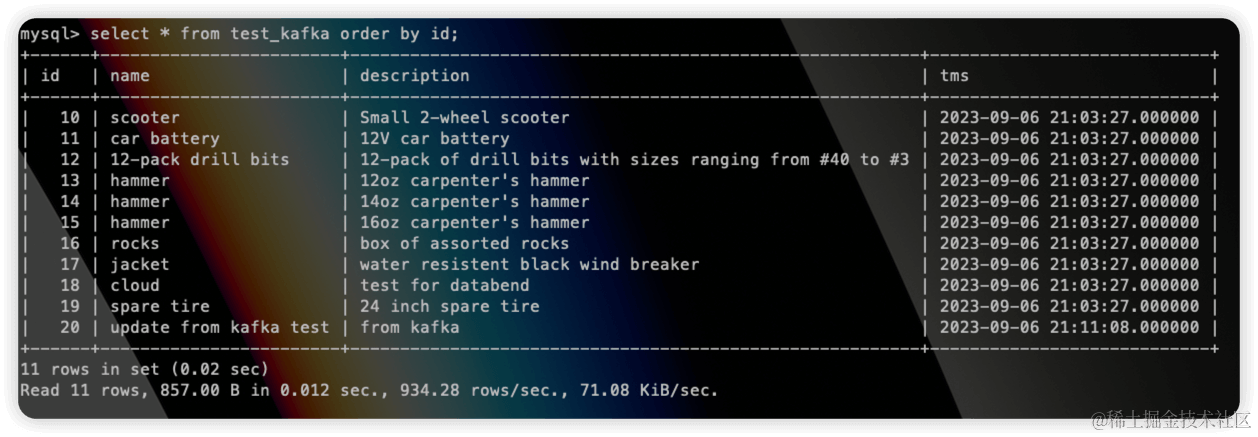
Update a row in the source table:
update test_kafka set name="update from kafka test" where id=20;
Check the target table:
Summary
Key Features of Databend Kafka Connect:
-
Automatic Table and Column Creation: With the configuration options
andauto.create, tables and columns can be automatically created. Table names are derived from Kafka topic names.auto-evolve -
Support for Kafka Schemas: The connector supports Avro, JSON Schema, and Protobuf input data formats. Schema Registry must be enabled to use formats based on Schema Registry.
-
Multiple Write Modes: The connector supports both
andinsertwrite modes.upsert -
Multi-Task Support: Leveraging the capabilities of Kafka Connect, the connector can run one or multiple tasks. Increasing the number of tasks can enhance system performance.
-
High Availability: In a distributed mode, the workload is automatically balanced, and dynamic scaling (up or down) is supported, providing fault tolerance.
Additionally, Databend Kafka Connect can also utilize the configuration options supported by native Connect. For more configuration details, please refer to Kafka Connect Sink Configuration Properties for Confluent Platform.
Subscribe to our newsletter
Stay informed on feature releases, product roadmap, support, and cloud offerings!

